So I've had it. I'm so done with looking anywhere and everywhere in my house and seeing nothing but clutter and things without homes strewn on nearly every surface. This is not making me happy, in fact, at times, it makes me feel like an elephant is crushing my chest. TOO MUCH STUFF!!! as the Robert Munsch book says.
Anyone who has ever set foot in my house can attest to the fact that rather than show it off with pride, I apologize for the [perpetually] messy state it's in, almost to an annoying degree. I begrudgingly give tours showcasing my incomplete projects (yes, I will paint that last wall....1 year later), and ultimately lack of organization, which I seem to have passed along to my kids. Sure, it's expected that a house where there is someone at home at least 99% of the time, with two kids and a dog and cat, will look lived in but what I see in some corners, like my dining room currently, is more like something in a style I like to call "frat house chic": cases of empty beer bottles and an extra mattress leaning up against the wall. Niiicce. Might I add that this week I had the pleasure of meeting my older daughter's boy-who-is-her-friend's mother when she came over to pick her up for a movie. She followed me into the house (GASP!!!) and I could barely hear what she was saying for my head was spinning with the thoughts of what she must think of the place!
I chalk it up to two things: a lack of organization and my inability to throw things away! As a keen recycler since I was a child, it pains me with guilt to throw things out - a breakthrough realization that I recently became aware of - but as my husband says, "Some things are just garbage, Nancy." And with that, the light bulb of realization went on and so did my commitment to clean up our act.
So with that, I'm launching a summer series of posts. In reality I know it is not something that will be completed over the summer months alone. Cleaning up 5 years of living in a house + a lifetime of bad clutter-causing habits will surely take more than 10 weeks, however, it's a fun and lighthearted approach to what could be a very daunting project.
My first step, and really the methodology for the project will be to go room by room, identifying those trouble spots that seem to be natural dumping grounds for stuff (Clutter Corners as I like to call them) and really look at why this is the case. For example, is it because the things that get dumped there have no other home? Is it because we don't know what to do with them or don't want to be ruthless and throw them out? Looking at the psychological reasons these Clutter Corners happen will be key to figuring out solutions.
I will do this room by room and then revisit the list to implement solutions for each problem. Then once that is done, go project by project (for me, starting very small so I don't get overwhelmed and leave things half finished is key) and implement the solutions. Some projects will be tiny and will take no time at all. Others might take longer but I'll make sure that I am not biting off more than I can chew.
I hope you'll check in every once in a while to see how it's going. I hope to provide before and after photos, sources for products and instructions for DIY projects, of which there will be many! My ultimate goal is to create a calming and comfortable space where our family can live and function more efficiently. Who am I kidding - I really just want to give house tours without embarrassment!
Thursday, June 28, 2012
Friday, June 15, 2012
Father's Day home stretch: What your guy REALLY wants
 As the weekend approaches, the world of consumerism is focusing on the next occasion to separate consumers from their money. Father's Day is on Sunday and all week I've noticed the never ending pleas in commercials and flyers to 'Get Dad what he really wants' or 'Treat dad this Father's Day' with this, that and the other. These phrases are often found on flyers for things dad would never, ever want, like, oh, a new patio set. Or that new polo shirt. Heck, even Pottery Barn was offering a free crafting event for Father's Day. The only thing I have to say regarding that one is I hope the intention was to offer a way to get the fam out of the house so dad can have time -gasp- alone!
And this brings me to the point of this post. If you really want to give your man, the father of your children, a fabulous Father's Day, I have a no-fail way to deliver. It consists of two things and two things only. The first is time alone. After the cute kid cards and coffee in bed (and at a decently-late hour I might add), what dad really wants is a day to himself with nothing to do and no one to interrupt this nothingness. Now, don't be offended. Think of Mother's Day. We like to be pampered. We like to be adored. Then we like to be left alone. The same goes for dad. He doesn't want at picnic at the park with the family. Or dinner at your in-laws, no matter if his favourite meal is in the cards or not. No, he wants time to be without the pitter patter of kids and animals and absence of the honey-do list that normally hangs on the fridge, and all in the silence of an empty house.
The second thing that will make your man's day is something that is hopefully part of your life anyways, but if not, it'll really blow his socks off. I'm talking about sex. Yes, those three little letters can carry a huge amount of happiness. That is really what he wants. And not the rushed quickie kind or with a feeling of obligation. A really honest-to-goodness fun time with fewer time constraints than usual if possible, and a genuine interest in making him feel supa dupa. Afterall, he is the man you chose to father those gorgeous little gems of children, so isn't he worth the time and effort? And with that, I throw to this blog post which I really think says it all, and very well: Give a guy some nookie.
Happy Father's Day!
Tuesday, June 12, 2012
Party decorations aren't just for parties!
It's hard not to smile when you walk into a room decorated for a party, especially with colourful streamers and banners hanging overhead. So why not use these items in everyday decorating to as a bit of whimsy to a child's bedroom or playroom? It's an easy way to brighten a room and add another layer to your room theme or colour scheme.
Gimme a P! Gimme an O! Gimme an M! What does that spell?
One half of pom pom!
Pom poms aren't just for cheerleaders anymore. Thanks to the queen of entertaining herself, Martha Stewart has revitalized paper party decorations, reinterpreting the typical honeycomb-style decorations of the 70s and 80s into a classy and delicate pom pom. You can buy them in a package in coordinated palette of colours and sizes, or DIY-it and make your own. Either way, they add charm and fun to a room.

Tip: you can also make your own by snipping folded sheets of tissue paper into strips, cutting from each edge towards the centre, but leaving the middle of the paper intact. Cut the edges so that you cut off any of the folded edges, then with a ribbon, bunch up the centre that isn't cut, and tie. You might have to play around with the density of tissue to get the right size and shape, but this is a great way to use pretty tissue that may have come in a gift bag but is too crumpled to reuse for wrapping.
 Pennant-style banners
Another look I love is pennant banners made from scraps of patterned paper or fabric. It's a nice way to use up pieces from sewing projects or display pretty scrap book paper or wrapping paper. Here is a DIY tutorial for making your own banner like the one pictured on the right. 
If you don't want to sew a pennant, its just as easy to use hem tape and an iron to attach the triangle pieces to your ribbon.
 |
| Pattern to illustrate cutting a paper pennant |
 |
| Pennant hung across a room |
Alternately, here is another blog DIY tutorial from Artsy Fartsy Shopaholic. She shows another no-sew method to creating a pennant banner. The nice thing is all you need is a hole punch and string!
Garland
Pom poms can be turned into garland too, as can many other items, such as circular stickers, fabric strips and paper shapes. The photo below is a collage of various ideas for creating garlands. Click through to view the original post on Kojo Designs. The blog includes links to a tutorial for these garlands.
Have fun with these ideas and keep an eye out for inspiration in the party isle. Even if you don't make your own, decor kits such as Martha Stewart's party favours are sold at Michael's and Wal Mart and are a great and easy way to add a bit of whimsy to a room, so have fun!
Saturday, June 2, 2012
Ice cream fondant cake
This is the most recent cake that I made and decorated. It was for a cake raffle fundraiser for the kids' school and I really look forward to this event every year. My inspiration came from a lovely cake I found on Pinterest. I made the two layers using this fantastic recipe (I will have to make a cake of our own to enjoy - my taste test consisted of the paper-thin layer I sliced off the top to even up the layers). I also used the ever-indespensible Duff's White Buttercream Fondant. Yes, it's pre-made but it works so well and a butter flavouring adds, well...flavour! It's available at Michael's craft store (and really affordable if you use their weekly 40% off coupon!).
It was a lot of fun to put this together. Everyone chipped in too. My husband saved my sanity at 2 a.m. by coming in and making the little white pearls/beads that sit around the base. By that time I had limited patience to make them as uniformly perfect as he did!
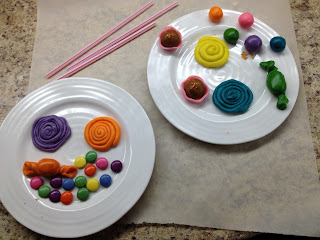
My oldest daughter helped model some of the treats, also made from fondant coloured with gel food colouring by Wilton. I bought a combo pack of 12 colours from Bulk Barn for around $20 - a great investment because I can make virtually any colour I need now by blending the different shades.
Here's a closer look at the details:
And the crowning glory is a "melting" ice cream cone with sprinkles. This treat isn't entirely faked. The cone is a real sugar cone and the inside of the scoop of ice cream is a hidden goodie - I made Rice Krispie balls and used one for the base and covered it with fondant (a trick I learned from watching Ace of Cakes)!
I was really happy with the result and I hope who ever won this cake at the school enjoyed it! Interested to learn more? Reach me on Twitter @MissNancyC or email me: nceresia@rogers.com. As always, share the link and your comments below.
Thanks for visiting!
 |
| Before: Here is the two-layer cake with Duff Goldman's Buttercream Fondant |
 |
| After: Ta-da! Here's the finished product! |
It was a lot of fun to put this together. Everyone chipped in too. My husband saved my sanity at 2 a.m. by coming in and making the little white pearls/beads that sit around the base. By that time I had limited patience to make them as uniformly perfect as he did!
 |
| Bead trim at base of cake makes the edge seamless. |
My oldest daughter helped model some of the treats, also made from fondant coloured with gel food colouring by Wilton. I bought a combo pack of 12 colours from Bulk Barn for around $20 - a great investment because I can make virtually any colour I need now by blending the different shades.

Here's a closer look at the details:
 | |
| Swirly pops, straws cut to size for the sticks. |
 | |
| Chocolate bonbon - all fondant. |
 |
| Mock sugared-citrus slices |
And the crowning glory is a "melting" ice cream cone with sprinkles. This treat isn't entirely faked. The cone is a real sugar cone and the inside of the scoop of ice cream is a hidden goodie - I made Rice Krispie balls and used one for the base and covered it with fondant (a trick I learned from watching Ace of Cakes)!
 |
| Hidden goodie inside. |
I was really happy with the result and I hope who ever won this cake at the school enjoyed it! Interested to learn more? Reach me on Twitter @MissNancyC or email me: nceresia@rogers.com. As always, share the link and your comments below.
Thanks for visiting!
Subscribe to:
Posts (Atom)